I found the perfect AeroPress accessory for cold brew — but you'll need to be patient with the PUCKPUCK
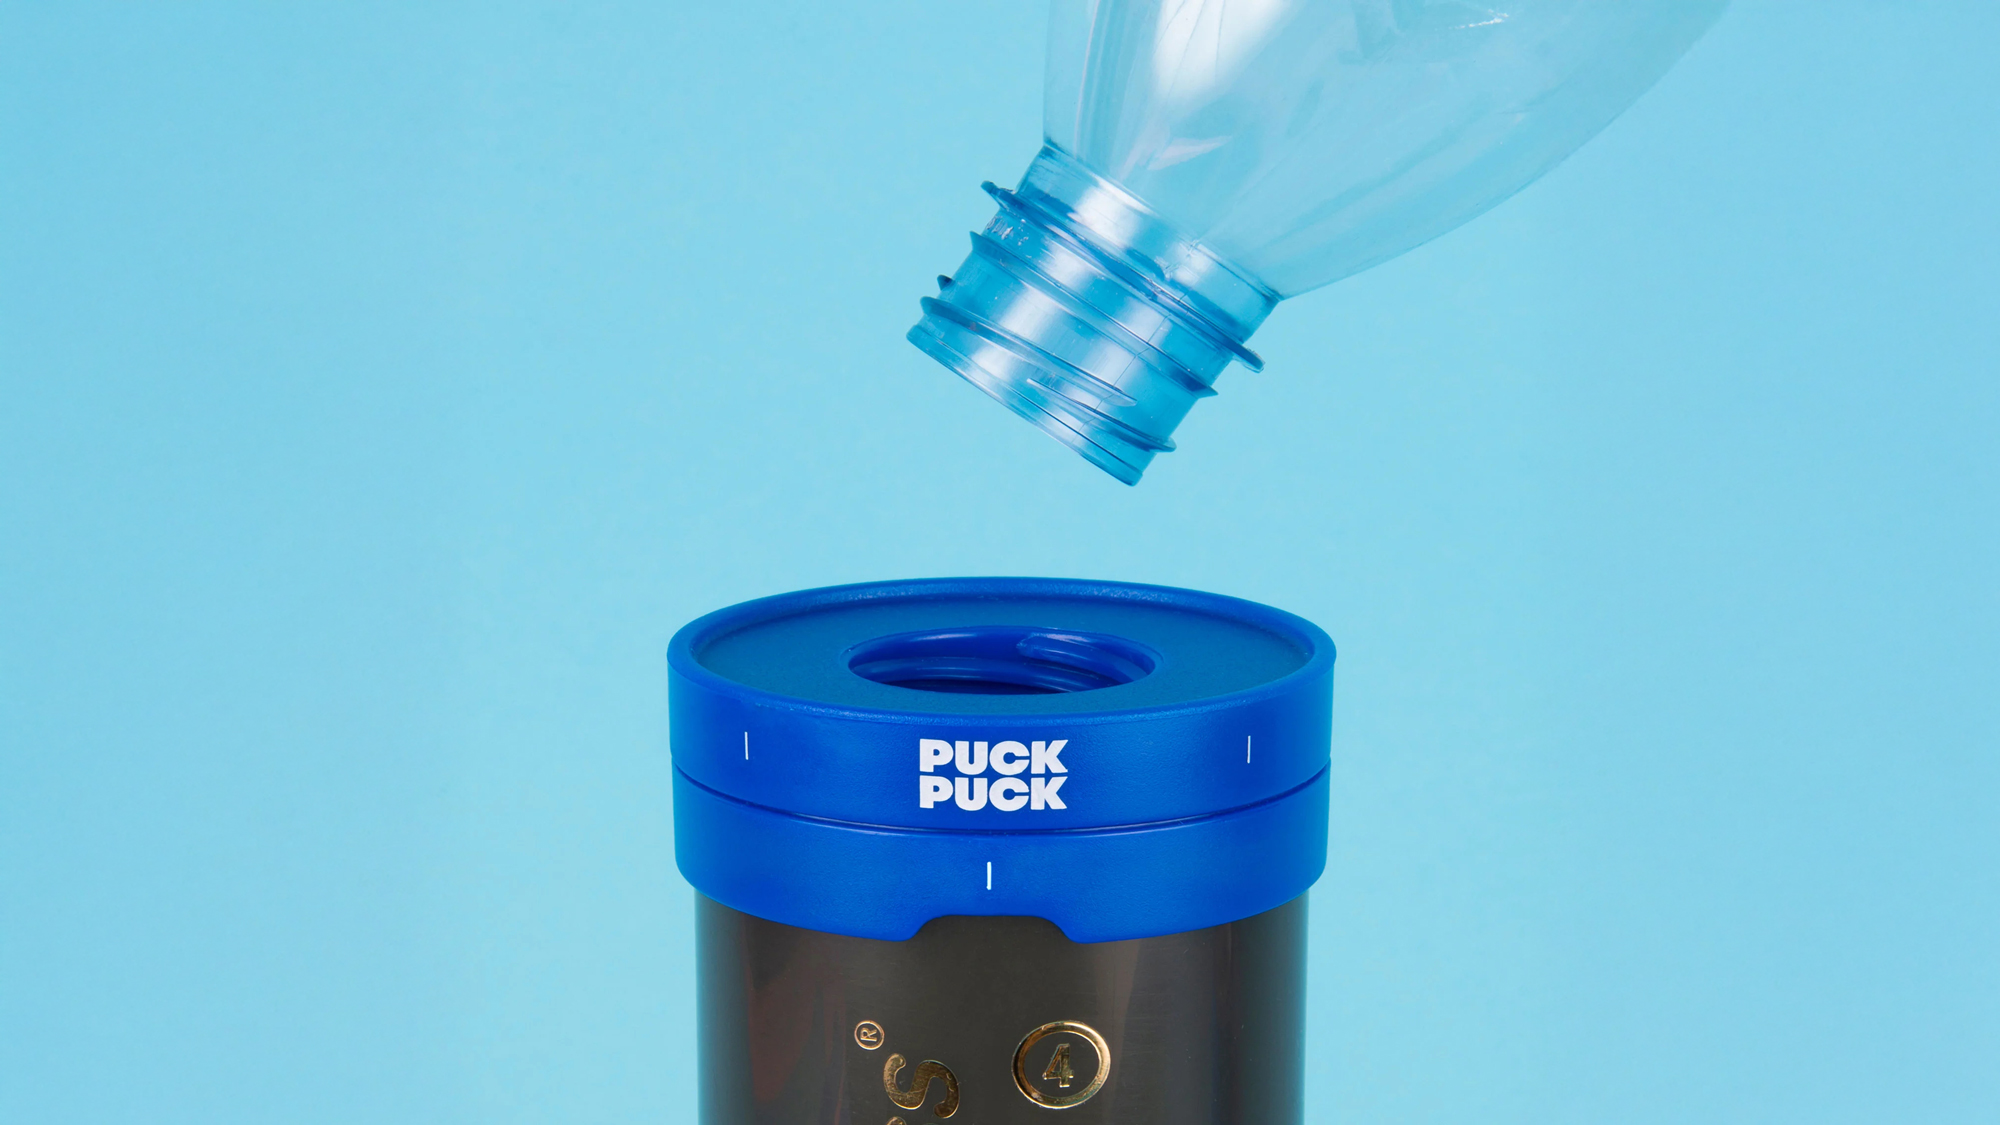
With summer soon upon us, the enticement of a steaming cup of Joe is not quite the same, as we try to stay cool under the sun. But coffee aficionados can rejoice, as there are ever-increasing ways to enjoy a caffeine hit without the heat. Cold brew coffee is a refreshing alternative to this popular hot drink, and it’s easy to make at home. So, I gave making a cold brew a go with the PUCKPUCK cold brew drip coffee adapter that's designed to work with an AeroPress. Would it be easy to use, make a tasty brew, and be worth $36? What is a cold brew coffee? A cold brew is made with cold water, and it’s not the same as iced coffee, which is regular coffee made with hot water and cooled down. The brewing process is different, and the coffee grounds are steeped in cold water for a long period. If your idea is to grab a quick homebrew coffee and go, this isn’t for you. Before getting stuck into making a cold brew with the PUCKPUCK, I would buy the PUCKPUCK cold brew adapter for the name and packaging alone. It certainly hits a spot and scores top points for branding. I recently tried the 2Pour AeroPress accessory that makes two brews at once, but the branding and packaging design doesn’t come close to the PUCKPUCK. Having previously worked for a design company, I know the importance branding can play in a purchase. But, despite the funky design, the PUCKPUCK has to prove itself in terms of performance. What's included Inside the box, you’ll find a blue filter, which unscrews into two sections, a splash filter, and a water and ice chamber with a lid. You’ll also find a handy instruction booklet that tells you what you’ll need to make a cold brew and how to do it. The filter Part of the magic about the PUCKPUCK is the adjustable value. The patented design regulates the flow of water over the coffee grounds and delivers a sweet and less acidic brew. You can also set the drip speed to suit your taste. The PUCKPUCK is designed to work with an AeroPress, so if you don’t already own one, you’ll either have to make a purchase, or find an alternative way to make a cold brew drip coffee. Apart from an AeroPress and a filter paper, you’ll also need 38g of medium ground coffee (slightly coarser than you would normally use to make an AeroPress coffee), 400ml of water and 100g of ice. You’ll also need a jug, or large enough vessel to contain the brewed coffee. How does the PUCKPUCK work? If you're used to making an AeroPress coffee, you'll find using the PUCKPUCK relatively easy. Here are the steps I took when I used the PUCKPUCK for the first time. PUCKPUCK1. Pop out the splash filter from the blue PUCKPUCK device. My son spotted the sticker and swiped it up for safe keeping! 2. Rinse the three parts under water and shake off any excess water. 3. Twist the two sections of the PUCKPUCK together, ensuring the side vents are clear. AeroPress1. Add a paper filter to the AeroPress filter and screw it into the base. 2. Place the AeroPress onto your chosen vessel. 3. Add 38g of coffee to the AeroPress, medium-ground works best, and give the chamber a shake. 4. Carefully drop the PUCKPUCK filter on top of the coffee grounds. I found this was a bit tricky as it landed at an angle, and I had a couple of attempts before I got it right. Getting everything into position1. Now place the PUCKPUCK on top of the AeroPress. 2. Screw the included water vessel into the top of the PUCKPUCK, alternatively you can add a mineral water bottle if you are out and about and are making a portable brew. 3. Add 100g of ice and then 400ml of water. Adjust the filter 1. Very slowly, turn the PUCKPUCK anti-clockwise. I was nervous doing this at first, as I was worried everything would topple over! You’ll be able to see drips descending from the value. 2. PUCKPUCK suggests aiming for a drip rate of about 50 drops a minute, which will take 2.5-3 hours to brew. If you want help setting the drip rate, PUCKPUCK has an app you can download on your Android phone or iOS. I didn’t try this out when I tested the gadget, but if you’re after precision, it’s worth a shot. Slow and steadyMy advice, you can't be in a rush when making a slow brew drip coffee, so if you gasping for some caffeine, make a normal brew with your AeroPress first! Or, be prepared and start the brew the night before you want to drink it. If you prefer a visual guide to how to make a cold brew drip coffee with an AeroPress, Joshua from Alternative Brewing has compiled a useful YouTube video. How to enjoy your brew Once you’ve made your slow-drip coffee, you can enjoy it straight away, or it can be kept in the fridge for up to two weeks. You can also serve it with ice, milk or dilute it with hot water. So, it gives you multiple options of how you can enjoy your cold brew. I enjoyed a glass of the coffee with ice as soon as it had finished brewing, and placed the rest in my fridge to enjoy later. Is the PUCKPUCK worth it? It did taste like a premium coffee, but $36 is a step price to pay when you consider you can pick up an AeroPress for less. Currently, the AeroPress Original Coffee Press is discounted at Amazon for $34. It's also relatively easy to use, once you get used to how to set the filter, which doesn't take long. Plus, it's lightweight and portable, so you can take it on your travels packed up with your AeroPress. Although the price is steep, the PUCKPUCK’s packaging is fun and would make an excellent gift for anyone who is nuts about their brew. I'm not sure I would pay out for it otherwise. More from Tom's Guide Discover AeroPress vs Chemex: Which brews a better coffee?And I upgraded my AeroPress with this $25 gadget, and my coffee has never tasted betterPlus, AeroPress just upped the stakes in portable coffee — meet the AeroPress Go Plus